Last week we looked at some of the reasons to use layers while working in Photoshop. Now let’s see some of the flexibility that Layer Masks can bring to the workflow. As mentioned last week, there’s more than one type of layer in Photoshop. To understand masks, we’ll begin with Adjustment Layers because they come with a mask automatically attached.
What are Layer Masks?
Quite simply, Layer Masks are your way to tell Photoshop which parts of a layer to use or hide, without having to actually delete a thing. On an Image Layer this means, for example, being able to erase part of a photo without losing the data and, with a sweep of the Paintbrush, being able to bring back what you erased.
On an Adjustment Layer, a mask lets you choose which areas of the photo to apply the adjustment to. Instead of having to use only blanket adjustments across the entire photo, this means that you can isolate certain areas. There are endless ways this can be used. Let’s look at a simple example, following on in the theme of contrast.
In Action
Here’s a photo taken outside Venice last summer:
(I was in a “labeling the obvious” phase at the time I took this)
The colours in this photo are pretty dull with definite room for improvement, so let’s see what we can do.
This is what the photo looks like if I try to use an Curves layer to increase the contrast, without masks, as we did previously:
This is the strongest contrast I can create without the dark areas beginning to look too dark and underexposed. There’s some colour improvement over the original, but the sky is still dull, and the rest isn’t as good as it could be.
With no masks, the quick Adjustment Layers I would use to improve the sky would make the whole photo look like so:
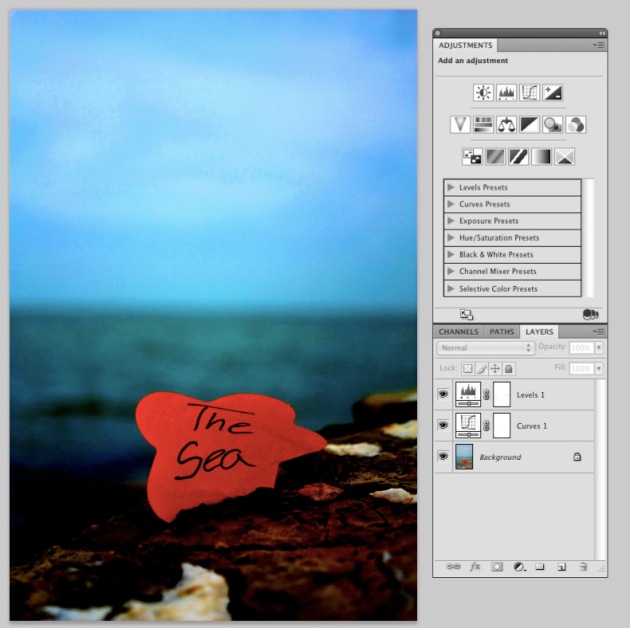
This change is made up of one Curves layer to balance the colour channels and one Levels layer for a little more contrast. The sky and sea are more inviting, but the foreground is dreadful. This is where Layer Masks become invaluable.
As we discussed at the start, Adjustment Layers are created with automatic Layer Masks attached:
So, I’ll select the Layer Mask I want to work on.
When you click on a mask a little box appears around it, as in the screenshot above. The box looks less like a box and more like a double line. This is useful to make note of because it’s easy to forget which layer or mask you’ve selected and start erasing the wrong thing. More often than I’d like to admit, I have to undo a couple of minutes of work because I’ve been erasing the image instead of the mask.
Next I’ll select the Eraser tool, and check that my paint colours are set to the default black and white.
Now I will use the Eraser tool to soften the areas of my selected mask that I think are too strong. If I make a mistake, or change my mind, all I have to do is select the Paintbrush tool and paint back over the areas I erased.
I tend to do this kind of work with my Paintbrush and Eraser set to a soft edge and a medium opacity. To change these settings, select the Eraser tool, or the Paintbrush tool, and adjust them in the tool settings that appear just under the toolbar at the top left of the window.
Here are my current Eraser settings, as an example:
The size, softness and opacity are the only settings I usually change.
When you look at your Layer Mask thumbnail where it’s clipped onto your Adjustment or Image Layer, you will see the shape of the mask. This shows which parts of the layer are hidden and which are showing. A white area means that that part of the layer is visible (unused Layer Masks will just be a block of white), blackmeans that that area of the layer is hidden. If part of the mask is grey, it means that it the layer is not at full strength in that area and the opacity will be reduced.
While working with Layer Masks, remember, “White reveals, Black conceals.”
Back to the picture. Once I’ve used the Eraser tool to clear away areas of the mask that are too strong for the whole image, this is what it looks like:
Better, no?
Now the Curves and Levels layers are mainly affecting the water and the sky, and not the rocks and the post-it, where they’re not needed so much.
But so the rocks don’t feel left out, let’s make one last change. Stone is fun to pull detail from with extra contrast. To change the contrast in the rocks, I’ll show you the way I create an Adjustment Layer with a mask already tailored roughly to my image.
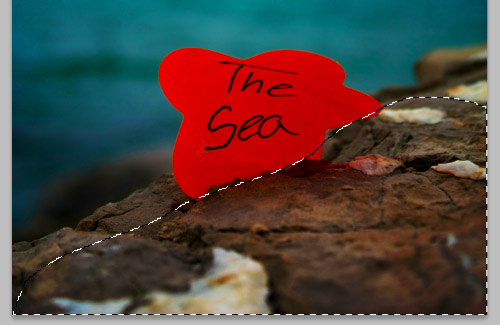
First select the Lasso tool:
 Then make a rough selection of the area you want to apply the adjustment to. I really mean rough, just a quick grabbing of the approximate area is fine.
Then create an Adjustment Layer, in this case I think I’ll make a Levels layer.
If you have a selection already made when you create an Adjustment Layer, this selection is transferred to the new Adjustment Layer and Layer Mask automatically. This means that everything not selected, is blocked out. The selected area is where the adjustment will be visible.
In the above Layer Mask, the white area is the area that will be affected by the Levels adjustment. The black area will be left untouched.
Use the Adjustment Layer to make the changes you want in the selected area, in this case a contrast adjustment, then use the Eraser and Paintbrush to fine-tune the Layer Mask’s coverage. Make sure to use a soft Paintbrush/Eraser to soften any sharp edges left from the selection, as these will be noticeable in the final image if they’re forgotten.
With the rocks selected and a Levels adjustment applied only to them, this is how the photo looks:
As a final touch think I’ll straightened the horizon with the Ruler tool.
There. And while I was cropping the long corners from the turned photo, I cropped off a little extra at the bottom to improve the composition.
Here’s the final result:
This edit is only three Adjustment Layers applied across fairly wide areas. Using Layer Masks you can create an edit as precise and intricate as you want it to be. Sometimes this yields incredible results. Other times simple is best.
Experiment and see what you prefer.


Fantastic post! Layers have always confused the heck out of me.
Thanks for inspiring me
Thank you for reading, I’m so glad to be of help! 🙂